At first, i thought it is not possible to increase the VM disk size. Only way is to recreate a bigger image. But after some googling and testing, i manage to increase my VM disk size without recreating a new image.
Steps to increase VM disk size:
I have a 3.8GB VM image, the following steps will show how to increase it to 6GB.

1> To increase the VM disk size,
- Move to VMware directory. e.g "C:\Program Files\VMware\VMware Workstation"
- Use the command "vmware-vdiskmanager -x". e.g "vmware-vdiskmanager -x 6GB G:\myDisk.vmdk" (refer to picture above)
- The additional space created will be unallocated space in your VM image. To merge it into the exisitng partition, you can use "diskpart" (as shown in step 7 and 8).
Note: The "vmware-vdiskmanager" command only works on disk with no snapshots. The "diskpart" command will not be able to merge a system partition, you will need to mount it and boot up from another VM image.

2> To mount your "increased" VM image(VM1) to another image (VM2)
- Select "Edit Virtual Machine Settings" from VM2.
- Select "Hard Disk" and Click "Add".

3> Select the Hardware type
- Under "Hardware type", select "Hard Disk" and click "Next".

4> Select what type of disk to be used for the drive
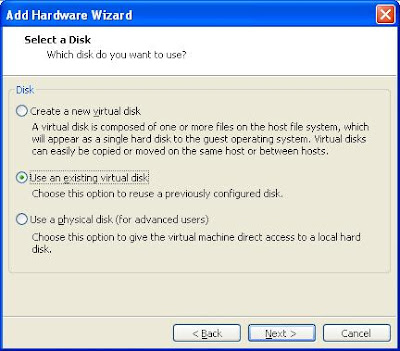
- Under "Select a Disk", select "Use an existing virtual disk" and click "Next".

5> Select the location of the existing virtual disk
- Select the location (path) of VM1 .vmdk file by clicking the "Browse...".
- Click "Finish". The VM image (VM1) is mounted into VM2
- Startup VM2 image

6> Check that VM1 successfully mounted into VM2
- Under "Control Panel" > "Admintrative tools" > "Computer Management" > "Disk Management".
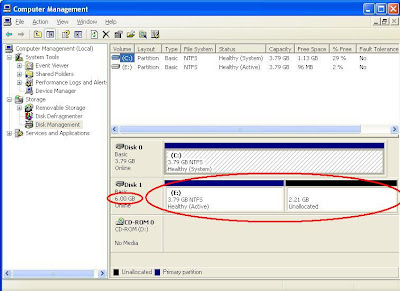
- You should see VM1 mounted as one of the virtual disk (with both allocated and unallocated space). In the picture above, it is mounted as Disk 1.

7> Using command line utility to resize disk partitions in Windows.
- From "Start" button, select "Run".
- Type "diskpart" to run the commandline utility.

8> Merge the unallocated space with diskpart
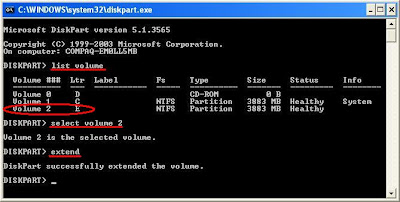
- Type "list volume" to list all the disk volume.
- Based on the drive letter and the vloume size, choose the volume to merge by typing "Select volume
- Type "extend" to merge the unallocated space with the selected volume.

9> Check if the partition successfully extended
- If the merging is successful, you will see the unallocated space gone and the partition being extended to 6GB in the "Disk Management" console.
- You can shutdown the VM2 and remove VM1 from as the mounted disk.
- To remove VM1 from the mounted disk, follow step 2. Instead of adding, select the VM1 disk and Click "Remove".

No comments:
Post a Comment